by XDK
16. December 2015 18:06
Exception:
TF208101: You cannot access the Analysis Services database because you have specified alternative credentials and you do not have permission on your computer to impersonate another user
Explanation:
The TF208101 error occur when trying to create Excel Reports from a TFS query using Visual Studio IDE
Solution:
- Right-click the visual Studio IDE icon or shortcut, and then click Run as administrator.
- Export the work item query to excel.
by XDK
18. November 2015 10:00
Explanation:
The mentioned error occur when the TFS URL is not properly configured for client access.
You can figure out the invalid URL location of the image by right-click --> Properties on the image in the Work Item field
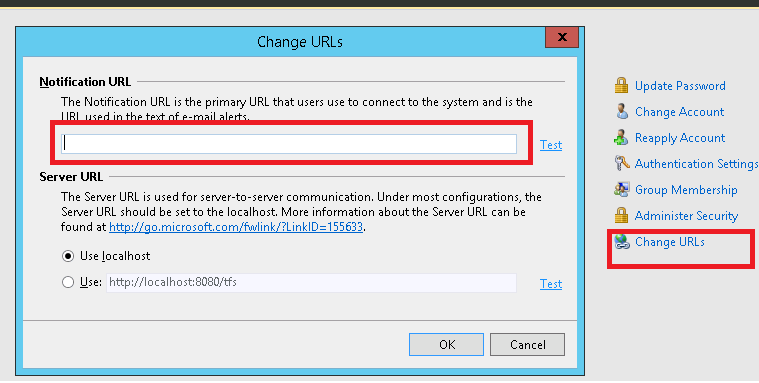
Solution for Web Access client
- Log on to TFS app tier
- Open "TFS Administartion Console"
- Select "Application Tier" node
- Check whether the "Notification URL" in the "Application Tier Summary" is configured with FQDN.
- If not configure as expected, then configure the URL with FQDN by clicking on "Change URL" as follows
Solution for Visual Studio IDE
- Close all Visual Studio IDE and IE instances
- Open IE.
- Add *.<your TFS domain>.com to the local intranet settings
-
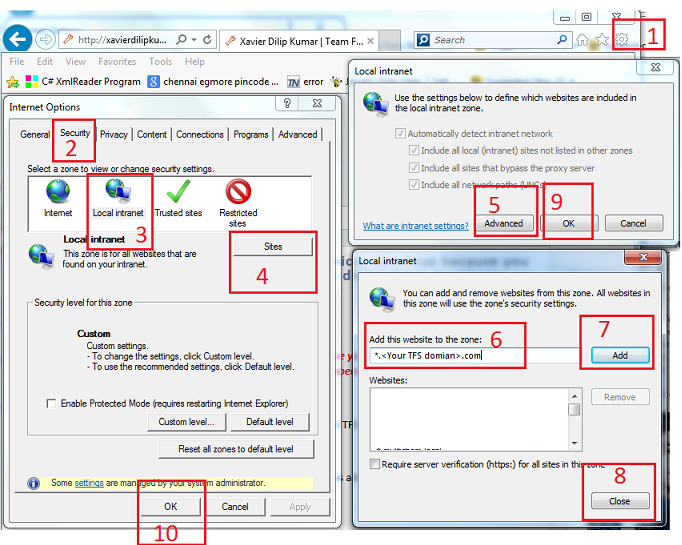
- Open Visual Studio IDE to verify the missing image
by XDK
8. October 2015 20:18
Details:
|
|
Destination |
Protocol Name |
Protocol Type |
Default Ports |
| Client Environment |
|
|
|
|
| Team Foundation Server Client |
TFS App Tier(s) or Load balanced |
HTTP / HTTPS |
TCP |
8080 / 443 |
| Team Foundation Server Client |
TFS Proxy |
HTTP |
TCP |
8081 |
| TFS Proxy |
TFS App Tier(s) or Load balanced |
HTTP / HTTPS |
TCP |
8080 / 443 |
| Build Environment |
|
|
|
|
| Build Controller |
TFS App Tier(s) or Load balanced |
HTTP / HTTPS |
TCP |
8080 / 443 |
| Build Agent |
TFS App Tier(s) or Load balanced |
HTTP / HTTPS |
TCP |
8080 / 443 |
| Build Controller |
Build Agent |
SOAP over HTTP |
TCP |
9191 |
| Build Agent |
Build Controller |
SOAP over HTTP |
TCP |
9191 |
| TFS App Tier(s) / Load balanced |
Build Agent |
SOAP over HTTP |
TCP |
9191 |
| Test Environment |
|
|
|
|
| TFS App Tier(s) / Load balanced |
Test Controller |
.NET Remoting |
TCP |
6901 |
| Test Controller |
TFS App Tier(s) or Load balanced |
HTTP / HTTPS |
TCP |
8080 / 443 |
| Test Controller |
Test Agent |
.NET Remoting |
TCP |
6910 |
| Test Agent |
Test Controller |
.NET Remoting |
TCP |
6901 |
| Data Tier, TFS warehouse , SSAS & SSRS |
| TFS App Tier(s) / Load balanced |
Data Tier(s) or Cluster |
MS-SQL |
TCP |
1433 |
| TFS App Tier(s) / Load balanced |
TFS Warehouse SQL Server |
MS-SQL |
TCP |
1433 |
| TFS App Tier(s) / Load balanced |
Data Tier(s) or Cluster |
MS-SQL |
TCP |
1433 |
| TFS App Tier(s) / Load balanced |
Reporting Services |
HTTP |
TCP |
80 |
| Team Foundation Server Client |
Reporting Services |
HTTP |
TCP |
80 |
| Data Tier(s) / Cluster |
Analysis Services |
MS-AS |
TCP |
2382 or 2383 |
| Collaboration Environment |
|
|
|
|
| TFS App Tier(s) / Load balanced |
SharePoint Server |
HTTP |
TCP |
80 / 17012 |
| SharePoint Server |
Data Tier(s) or Cluster |
MS-SQL |
TCP |
1433 |
| Team Foundation Server Client |
Share Point Portal |
HTTP |
TCP |
80 |
by XDK
8. October 2015 19:34
Explanation:
Yes. The TFS service account can be non interactive. But the account which is used to install and configure should be interactive and should have the following permissions.
- Local admin on the TFS Server
- SysAdmin on SQL Server
The interactive admin account used to install and configure the TFS will grant the necessary permissions to the non interactive Service account
by XDK
6. May 2015 13:35
Exception:
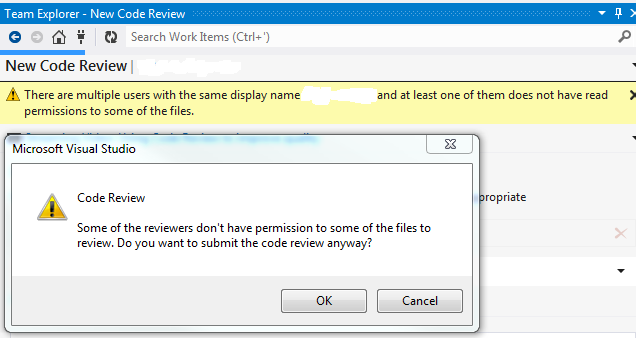
Explanation:
The above warning message is reproducible when the users have duplicate display names in Tfs_Configuration’s identity table.
Workaround:
Change the display name in TFS profile.
1. Navigate to Web Access and load a Team Project that has the Display Name you want to change.
2. Navigate to the Administration page by selecting Administer Settings option on the top right hand corner of the Web Access page.

3. Click on the drop down arrow next to your name
4. Select "USER PROFILE"
5. Click Edit to modify your Display Name.
6. Click "Save changes" button.
 Subscribe